Self-service overlay tool
This feature is in beta
The new Overlays Wizard (self service tool) allow you to add layers to the map.
These can be raster imagery like historic maps, blueprints, and aerial photography, or data layers like postcode boundaries, locations of events, and crowdsourced ecological data.
Users can browse these, search for them, or see them as pins on the map.
In Humap, an overlay can contain one or more layers. For example, an overlay for WWII bomb damage in London might include the following layers:
- 1940 Ordnance Survey Map (Raster images of a historic map)
- Bombing density contour lines (Vector data, showing areas)
- V2 rocket impact points (Vector data, showing points)
When a user turns on an overlay, the layers are added to the map, where their visibility can be turned on and off, their opacity changed, or their stacking reordered. The user can also click a button to zoom the map to the bounds of the layer.
Creating an overlay
You’ll need to be logged in as an admin, then head to your-project.humap.site/admin.
You’ll see overlays in the sidebar, from there you can click New Overlay and the wizard will walk you through building an overlay and adding layers.
The preview step
This step is where you can add layers and customise how they display, so it’s worth covering in more detail.
Click Add layer to start adding your first layer. Layers can then be sourced in three ways:
- Upload GeoJSON: If you have a GeoJSON file you can upload it here. The file will be tiled and saved to Humap. GeoJSON files should contain a collection of features, and should contain positions in WGS84, [longitude, latitude] – which is the standard. (More formats are coming!)
- Add from URL: If you want to add a layer that is hosted somewhere else you can paste in the URL for it here. You need to set whether it’s raster (most likely for image based layers) or vector (most likely for data layers – though not always!)
- Add from existing: If you’ve created layers previously, you can include then as part of this overlay.
[Include examples to play with]
Layer settings
Once a layer is added, if it’s a vector layer you can adjust the display settings – color, fill, line width etc.
For all layers, you can set the bounds. This is optional, but if set then users will be able to conveniently zoom to the bounds of your layer. You can enter the Southwest and Northeast extents of your layer – or much more easily draw a rectangle around your layer on the map with Draw new bounds rectangle.
Again for all layers, there are settings for zoom. For context, zoom ‘0’ is when you are fully zoomed-out and looking at the whole world, and zoom ‘20’ is fully zoomed-in, looking at your back garden.
The Minimum zoom level controls how far a user needs to zoom in before your Layer appears.
Note: This is complicated slightly because the tiles that you have added may not actually include tiles at that zoom level – in which case setting this value won’t make the tiles appear, they will show when the user zooms to a level where tiles are present.
The Overzoom level sets the last level of tiles to use as the user zooms right in. Bear with us: many tilesets don’t include tiles for higher zoom levels, because you need so many (literally billions to cover the world above zoom ‘15’) which poses issues for processing and storage …so this setting represents the highest level for which there are tiles – beyond that point the tiles are scaled up.
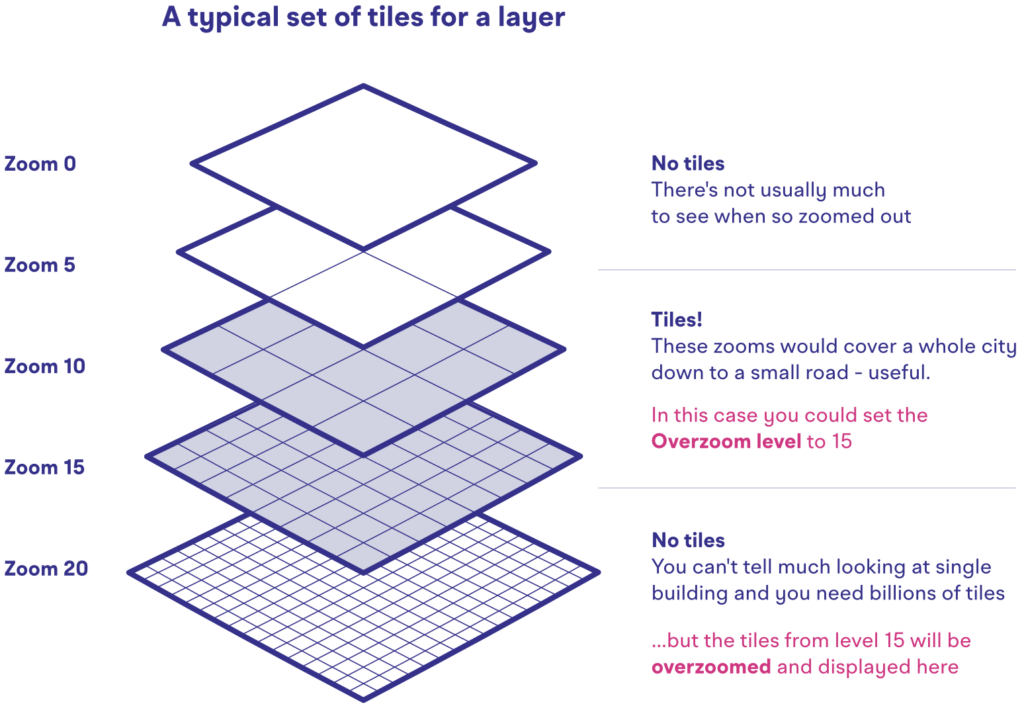
In practice: If your layer looks fuzzy when zoomed right in, you should increase the Overzoom level. If your layer disappears when zoomed in, you’ve gone too far and should decrease it.
The location step
You can add a pin for your overlay at a location on the map.
It doesn’t always make sense to have a pin when your overlay is large or covers multiple locations. That’s fine! Users can always find your overlay in the overlays section and in search results.
Notes for seasoned Humap-ers
You can still edit your Overlays the good old-fashioned way via the Advanced button. For creating new ones, you’ll need to use the wizard initially, but you can then edit them with this method. You can also still create layers manually at Overlays > Layers. If you want to upload GeoJSON you’ll need to use the wizard – it’s a new feature and not available in the admin panel.
This feature is in beta
This is a new feature which we are actively improving! If you experience any issues with it, please raise a ticket on our support portal or email [email protected].