🗺️ The Humap Newsletter
Sign up for:
- Unique offers and discounts
- News and updates from the heritage, EdTech, and mapping world
- Spotlighted content from across every Humap instance
Don’t worry – we only send one email a month 😉
This feature is in beta
If you want to create content quickly, as is often the case at the start of a new project, you can import data from a spreadsheet.
You can use this feature to populate a project with records rapidly – and each record can have uploaded images too. As long as your content has a latitude and longitude, and some basic content you can make use of this feature.
A spreadsheet ready for upload must have the following columns:
| Column | Notes |
|---|---|
| ID | Humap needs a unique id column to identify each record. This won’t appear in your project anywhere. If you run a subsequent import with the same IDs in this column the earlier records will be overwritten. |
| Title | The title of the record. |
| Latitude | This can be in any format. |
| Longitude | Same. |
The spreadsheet can also include these columns:
| Column | Notes |
|---|---|
| Date from | Date in yyyy-mm-dd or dd-mm-yyyy format. Slashes, hyphens or stops/periods are acceptable separators. |
| Date to | Same. |
| Date precision | You can set your date precision for each record to day, month, or year. Full dates must be entered but only the required parts will be saved. If you don’t include this column, by default, full dates to the day will be saved. |
You can assign taxonomy terms to your records at the point of import by including the terms for a single taxonomy in a column. Use multiple columns for multiple taxonomies.
For example, if your taxonomy was ‘Counties’, you can create a column for that, and for each row the content would be something like:
Middlesex; Hertfordshire; Essex;
Terms will be created if they don’t already exist.
You can download a template spreadsheet here:
You don’t need to follow column names exactly – as part of the process wizard you can map your columns to the properties Humap needs.
You can optionally attach images to each of your records. To do this, create folders of images where the folder name matches the values in your record ID column. Zip this folder up, and you’ll be able to upload it when you upload your spreadsheet.
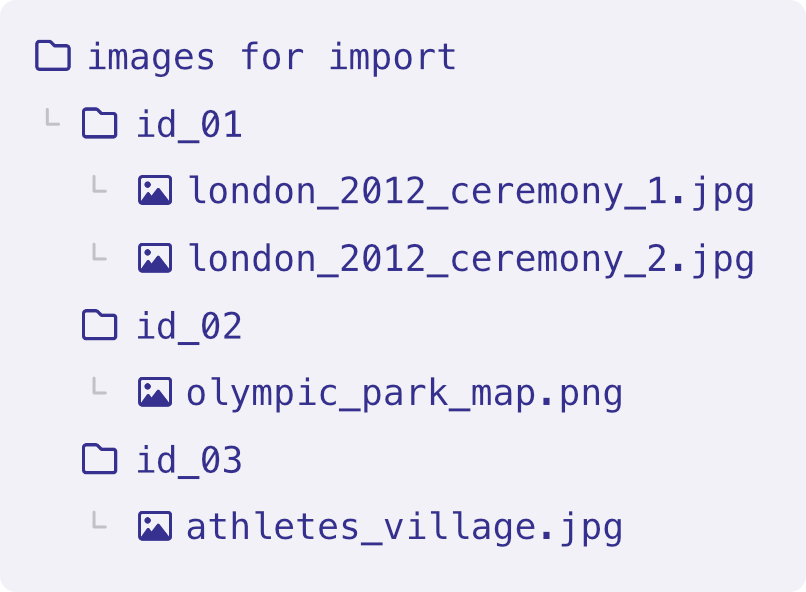
You can zip them all up in a single root folder, or have all the image folders in the root themselves – the importer doesn’t mind as long as the image’s containing folder name matches the record’s ID value in your spreadsheet. For example, id_01 MUST be the same as the record’s ID.
Log in to your Humap admin (your-site.com/admin) and select Bulk Imports > Record Imports in the sidebar. Click New record import in the actions bar to get started.
A wizard will take you through the steps required to run your import.
Imported records will be in an ‘unpublished’ state, so if you want to see them on the map straight away, you’ll need to publish them by going to Records (in the sidebar), ticking their boxes and then Batch Actions > Publish selected.
If you want to clear the records you have imported you can do this from the same place in your Humap admin: Bulk Imports > Record Imports. There’s a Destroy records button for each import.
The importer will only look at the first sheet in your spreadsheet, others will be ignored.
If you run an import a second time, records will be overwritten if their IDs are the same as last time.
If you are importing images, please make sure that the ID column cells in your spreadsheet are formatted as plain text. Occasionally, cells formatted as numbers will introduce unexpected decimal points and places, which gives the importer a hard time figuring out which images go with which record.
This is a new feature which we are actively improving! If you experience any issues with it, please raise a ticket on our support portal or email [email protected].


We usually respond in a few hours