
Importing records
This tutorial is available in video and text/image format.
Your content can be imported into your Humap project using the XLS spreadsheet format. This is particularly useful if you have existing data and lots of it.
As long as your content has a latitude, a longitude and a title, you can use this feature to import into the system to help speed up your content creation process.
Imports are incremental. Running the same file again can update the records it contains rather than creating duplicates, and records that aren’t in the file are left alone. No records are deleted by an import.
Your content
A spreadsheet ready for upload must have the following columns:
| Column | Notes |
|---|---|
| ID | A unique identifier for the record. It doesn’t appear anywhere in your project. Humap uses it to match rows to existing records on re-import, and to match image folders. Derive it from something stable like an accession number or asset ID, never from row position. If the ID changes between imports you’ll get duplicates. Format the column as plain text, not number, or leading zeros get stripped and decimal points appear where you don’t want them. |
| Title | The record’s title, shown as the heading on the map and in the detail panel. |
| Latitude | Decimal degrees, WGS84. For example 53.3811. |
| Longitude | Decimal degrees, WGS84. For example -3.0361. |
If you don’t have a precise location for a record, use an approximate one – the coordinates of the holding institution, or the centre of the parish. A record with empty coordinates lands at 0,0, which is in the Atlantic off West Africa – commonly referred to as Null Island in the world of GIS.
The spreadsheet can also include these columns:
| Column | Notes |
|---|---|
| Content | Body text for the record, shown in the detail panel. Basic HTML is fine, so paragraphs, bold, italic, line breaks and links. Inline styles are stripped. Spreadsheet cells cap out at 32,767 characters, so very long descriptions will be truncated. |
| Date from | yyyy-mm-dd or dd-mm-yyyy. Slashes, hyphens or full stops all work as separators. It has to be a real date. |
| Date to | yyyy-mm-dd or dd-mm-yyyy. Slashes, hyphens or full stops all work as separators. It has to be a real date. |
| Date precision | day, month or year. Enter full dates either way, and only the parts you’ve asked for are saved. Leave the column out and you’ll get full dates to the day. |
Taxonomies
Taxonomies are Humap’s older categorisation feature, and are separate from data fields.
Put the terms for one taxonomy in one column, and use a separate column for each taxonomy. Separate multiple terms with semicolons:
Middlesex; Hertfordshire; Essex
Commas inside a term are fine. Semicolons aren’t, because they’ll split the term in two.
Taxonomies must have terms created before importing
A taxonomy field holds a fixed list of terms, so those terms need to be in the taxonomy before you import.
A value that doesn’t match an existing term is dropped and an error will be logged in the import report. Create your terms first and the question doesn’t arise.
Before you import:
- Go through your spreadsheet and collect every unique value that appears in each taxonomy column.
- Go to taxonomies in the Humap admin.
- Create each term within the taxonomy. This currently has to be done one-by-one. Please get in touch if you require a large taxonomy to be imported.
- Check a few terms have landed correctly before you run the import.
Data fields
Data fields are the custom fields you configure in your project settings. They show up in the record detail panel and can be used for filtering. You will need to create your data fields before you import.
The column header in your spreadsheet doesn’t have to match the field name, since you map columns to fields in the import wizard, but matching names makes the mapping step much faster on a wide sheet.
| Field type | What to put in the cell |
|---|---|
| Short text | Plain text, single line, no markup |
| Long text | Plain text, multiple lines, no markup |
| Number | A whole number or a decimal |
| Date | YYYY-MM-DD |
| Boolean | TRUE or FALSE, any capitalisation |
| Controlled vocabulary | Semicolon-separated options that already exist in the field’s vocabulary |
Controlled vocabulary fields must have options created before importing
A controlled vocabulary field holds a fixed list of options, so those options need to be in the field before you import. This applies to data fields of the controlled vocabulary type only.
A value that doesn’t match an existing option is left blank rather than added, and an error will be logged in the import report. Create your options first and the question doesn’t arise.
Before you import:
- Go through your spreadsheet and collect every unique value that appears in each controlled vocabulary column.
- Join them into one semicolon-separated string, for example
Abydos; Beni Hasan; Esna; Hierakonpolis. - Open the data field in your project settings and paste the list in. Humap removes duplicates on paste, so it’s safe to paste again if you find you’ve missed some.
- Check a few terms have landed correctly before you run the import.
Collections and call-to-action links
Collection
A Collection column assigns each record to a collection. Use either the collection’s slug or its numeric ID.
Create your collections before you import. A record that references a collection which doesn’t exist yet will import with that field left blank, and you’ll have to fix it by hand or reimport afterwards.
Nested collections can’t be created by import. Set those up in the platform first.
If you have a lot of collections to create, get in touch before you start. We have a tool that can generate them in bulk from a list, which saves building them one at a time in the interface.
Call-to-action links
Four optional columns control the CTA button on a record’s panel. Leave them blank for records with no outbound link.
| Column | Notes |
|---|---|
| CTA Title | Title shown above the button |
| CTA Description | Short description shown above the button |
| CTA Button Text | The button label itself, for example ‘View this item’ or ‘Find out more’ |
| CTA URL | Where the button goes |
Images
You can attach images to your records by uploading a zip alongside your spreadsheet. The importer matches images to records by folder name.
Folder structure
Give every record its own folder, named exactly as that record’s ID value, and put its images inside. The filenames inside the folder don’t matter – only the folder name is used for matching.
id_01/
  photo.jpg
  detail.jpg
id_02/
  id_02.jpg
A record with only one image still needs its own folder. Images can’t sit loose at the top of the zip.
You can wrap everything in a single root folder or leave the record folders at the top level – the importer handles both.
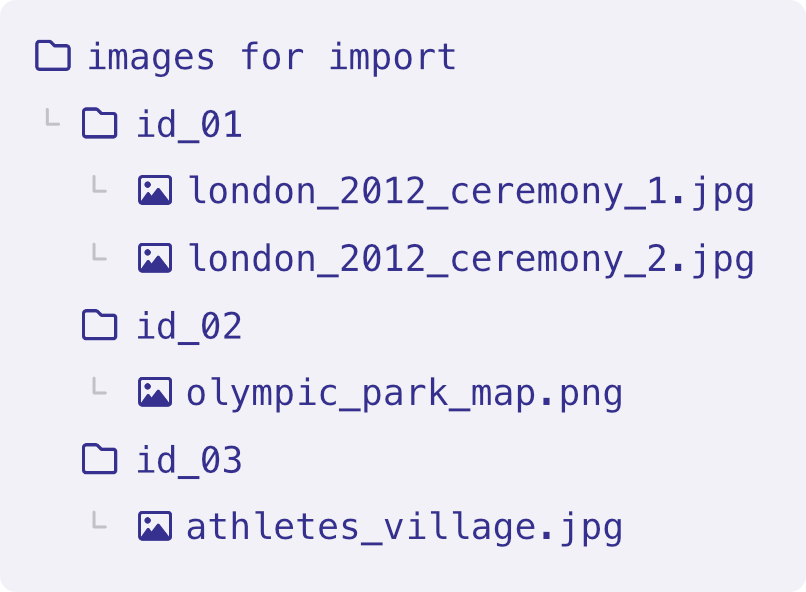
Folder names are case-sensitive and must match the ID exactly. This is also why the ID column needs to be formatted as plain text in your spreadsheet: a cell formatted as a number can pick up a stray decimal point, and id_01 stops matching id_01.0.
Limits
| Images per zip file upload | 2,000 |
| Maximum file size per image | 20 MB |
| Formats | JPG, PNG and WEBP |
| Images per record | No limit, everything in the folder is attached |
Please don’t upload TIFFs. They’re far larger than anything the map needs and they’ll slow your project down. Convert to JPG first, and ensure a resolution of 72dpi.
If you have more than 2,000 images, split them across several zips and run an import for each. Cut your spreadsheet down to just the records in that batch each time, so the importer isn’t reprocessing the whole set on every run.
Running an import
Before you start
This order is important. Doing these out of sequence is the most common cause of blank fields and records that need reimporting.
- Create your collections, and note each one’s slug or ID.
- Set up your data fields in project settings, with the correct type for each.
- Load the vocabulary terms into any controlled vocabulary fields.
- Prepare your spreadsheet, with the ID column formatted as plain text.
Template spreadsheet
You can download a template spreadsheet here:
Your column names don’t have to match the template. You map your columns to Humap’s fields in the import wizard.
The import
- Log in to your Humap admin (your-site.com/admin) and go to Bulk Imports > Record Imports.
- Click New Record import.
- Upload your spreadsheet. Only the first sheet is read – any others are ignored.
- Map each column to the Humap field it belongs to. One column can be mapped to more than one destination, so you can send a description column to both Content and a data field if you want it in both places.
- At the end of the mapping step, choose what blank cells should do. Leave existing values intact is the default: empty cells are skipped, so a gap in your spreadsheet won’t wipe what’s already on the record. Clear existing values empties the field instead. Then check the preview of your mapped data before you carry on.
- Upload your image zip at the same step, if you have one.
- Run the import, then check the import log.
- Spot-check a handful of records on the map. Check coordinates, images, dates, and especially any controlled vocabulary fields, which fail quietly.
New records arrive unpublished. To put them on the map, click the View Records button in the import list and choose Batch Actions > Publish selected.
Records that already existed keep whatever status they had. Updating a published record won’t quietly unpublish it.
Re-importing
Running an import again with the same IDs updates those records rather than duplicating them. Records that aren’t in the new file are left as they are.
What happens to a blank cell depends on the option you picked at the mapping step. On the default, a blank cell leaves whatever is already on the record untouched. If you chose to clear existing values, a blank cell empties that field, so an export that is missing a column can strip content you meant to keep. Worth checking before you reimport over records you have since edited in the platform.
That last point matters if your source data changes. If a record has been removed from a new data import, the importer has no way of knowing – it will simply stay on your map. Compare each new import against the last one before importing, and unpublish or delete anything that’s gone by hand.
Removing an import
To clear the records from an import, go back to Bulk Imports > Record Imports. Each import in the list has a Destroy Records button.
If something goes wrong
| What you see | Why | Fix |
|---|---|---|
| A controlled vocabulary field is blank | The value wasn’t in the field’s vocabulary | Add the missing term to the field, then import again |
| A field that had content is now empty after a reimport | The cell was blank and the import was set to clear existing values | Reimport with the value present, or use Leave existing values intact |
| Records sitting at 0,0 in the Atlantic | Latitude or longitude was empty or zero | Supply coordinates, approximate ones if you have to |
| Duplicate records | The ID changed between imports | IDs have to stay stable. Derive them from an accession number or asset ID, not row position |
| Images didn’t attach | The folder name doesn’t match the ID | Match it exactly, including capitalisation. Check the ID column is formatted as plain text |
| Collection field blank | The collection didn’t exist when you imported | Create it, then import again |
| A record is missing entirely | That row had no ID | Rows without an ID are skipped |
| Text is cut off | The spreadsheet cell limit is 32,767 characters | Shorten the text, or add the full version to the record by hand |
| Accented or special characters look wrong | Encoding | Save your spreadsheet as UTF-8. Older exports are often ISO-8859-1 |
Still stuck? Raise a ticket on our support portal or email [email protected].